To set up Laravel Forge on Custom VPS you need to follow the custom VPS route. First you need to make the VPS Server ready with the operating system of choice, then you need to set up passwordless ssh access for root and then you need to tell Laravel Forge to set up the Laravel LEMP. Here is how we did it on a Transip Blade VPS.
VPS Choice & Initial Step
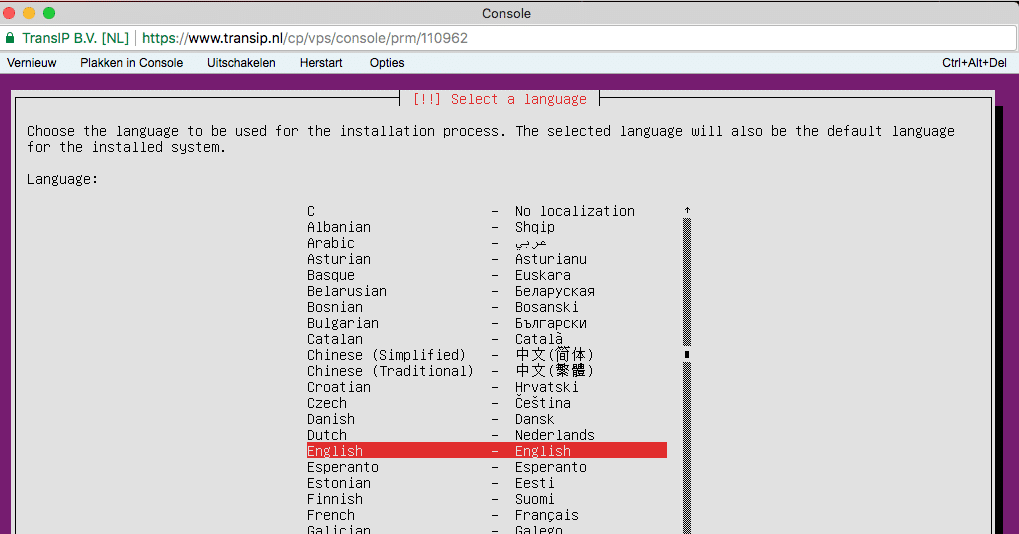
We got a Transip VPS Blade 4GB VPS with 2 cores. We installed Ubuntu 16.0.4 on it. At Transip you have to go through all the steps to set things up. Things like language:
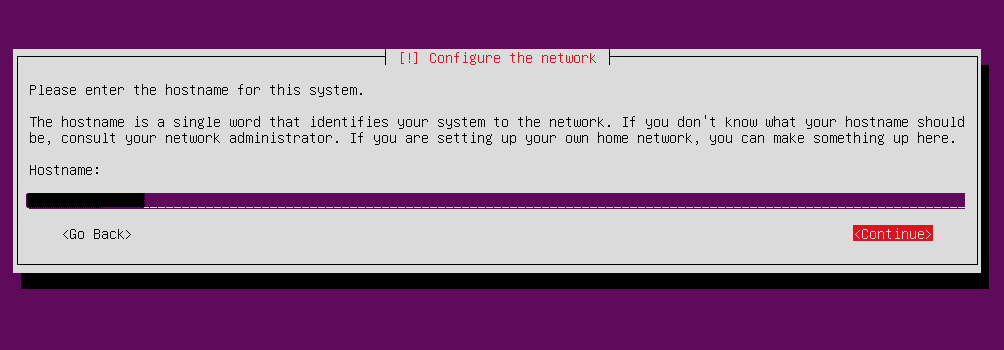
host name:
have to be chosen. You also need to:
- add a user for non administrative tasks,
- choose encryption for home directory or not,
- pick a partitioning option
- and so on.
- automatic (security) updates or not
Software Packages
You also need to choose the software package to install. As we use Forge to set all up we chose
- basic system utilities,
- basic server package
- and an Openssh Server*
if not installed this can be done with apt install openssh-server
Basically you set up a Ubuntu server from scratch. On Digital Ocean there is no need. And a ssh key for root access is added right away. That is not the case at Transip.
SSH Root Access
You need root access by Laravel Forge. This as you need to run the shell script as root. When you setup openssh-server it normally is setup with root blocked. So login with the user you setup, then do a
sudo nano /etc/ssh/sshd_config
then make sure you have
PasswordAuthentication yes
PermitRootLogin yes
, save and restart the openssh server with
sudo service ssh restart
Then do a sudo passwd to set a root password and
ssh-copy-id -i ~/.ssh/id_rsa.pub root@domain.com
to copy over your ssh public key. You could now revert password access for root and or for your setup user, but Laravel Forge should take care of at least the root part.
NB Perhaps this part can be shortened as less may be needed. Feel free to let me know.
Forge VPS Configuration
Pick a custom server first of course. Also, we assume you added your public key already. Choose a:
- name
- ip address
- ram (must be a number by the way!)
- php version
- post provision script if any
- database version
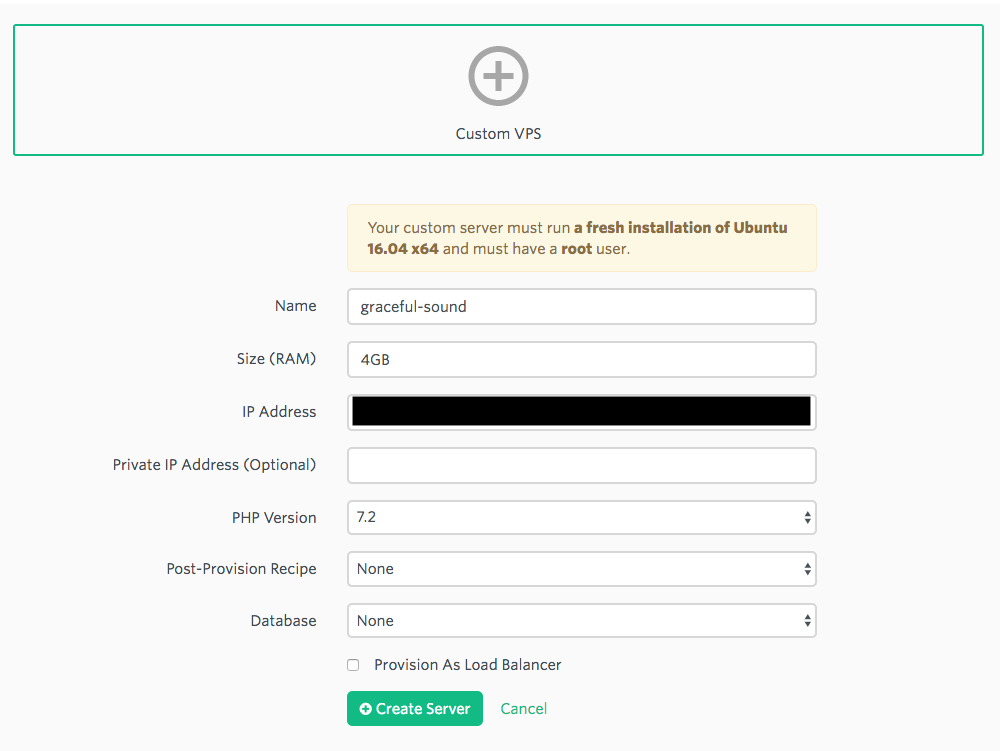
We picked a regular server without database as we will setup a database server later on.
Forge Shell Script
Then on clicking create you will get a popup with a script you should run on your server
wget -O forge.sh "https://forge.laravel.com/servers/11111/vps?forge_token=yourkey&recipe="; bash forge.sh
I removed the key here of course. Well this script does a whole bunch of stuff. The script will eventually be stored on the actual server. It is basically a full fledged setup of all you need. In my case a full LEMP without a database.
Forge User
Once this script has run its course forge has been set up as user. So you can log off as root and enter using
ssh forge@domain.com Welcome to Ubuntu 16.04.4 LTS (GNU/Linux 4.4.0-116-generic x86_64) * Documentation:https://help.ubuntu.com * Management: https://landscape.canonical.com * Support:https://ubuntu.com/advantage 3 packages can be updated. 0 updates are security updates. To run a command as administrator (user "root"), use "sudo". See "man sudo_root" for details.
Laravel Provision Check
When all went well the script will show no errors. You will also see that forge has been added as user as discussed and root shell access will also be blocked again:
ssh root@domain.com
root@domain.com: Permission denied (publickey).
They do this running:
# Disable Password Authentication Over SSH
sed -i "/PasswordAuthentication yes/d" /etc/ssh/sshd_config
echo "" | sudo tee -a /etc/ssh/sshd_config
echo "" | sudo tee -a /etc/ssh/sshd_config
echo "PasswordAuthentication no" | sudo tee -a /etc/ssh/sshd_config
You can also check if Laravel Forge can make the connection properly clicking the connection icon:

Forge Setup Email
Once you have connected properly you will also get an email that you did with details on forge and its password:
Your Laravel Forge server has been provisioned!
Remember, before you can access your server, you will need to add a public key via the Laravel Forge server management page. For added security, password authentication over SSH is disabled by default on all Laravel Forge servers.
Server Details:

Name: name-1
IP Address: xxx.xxx.xxx.xxx
Username: forge
Sudo Password: password
Default Site
We now have the general server up and running. We have however not set up the site, nor have we deployed our Laravel application. There is a however a default server block / site with this nginx configuration
# FORGE CONFIG (DOT NOT REMOVE!)
include forge-conf/default/before/*;

server {
 listen 80 default_server;
 listen [::]:80 default_server;
 server_name default;
 root /home/forge/default/public;

# FORGE SSL (DO NOT REMOVE!)
 # ssl_certificate;
 # ssl_certificate_key;

ssl_protocols TLSv1 TLSv1.1 TLSv1.2;
 ssl_ciphers 'YOURKEY';
 ssl_prefer_server_ciphers on;
 ssl_dhparam /etc/nginx/dhparams.pem;

add_header X-Frame-Options "SAMEORIGIN";
 add_header X-XSS-Protection "1; mode=block";
 add_header X-Content-Type-Options "nosniff";

index index.html index.htm index.php;

charset utf-8;

# FORGE CONFIG (DOT NOT REMOVE!)
 include forge-conf/default/server/*;

location / {
 try_files $uri $uri/ /index.php?$query_string;
 }

location = /favicon.ico { access_log off; log_not_found off; }
 location = /robots.txt { access_log off; log_not_found off; }

access_log off;
 error_log /var/log/nginx/default-error.log error;

error_page 404 /index.php;

location ~ \.php$ {
 fastcgi_split_path_info ^(.+\.php)(/.+)$;
 fastcgi_pass unix:/var/run/php/php7.2-fpm.sock;
 fastcgi_index index.php;
 include fastcgi_params;
 }

location ~ /\.(?!well-known).* {
 deny all;
 }
}

# FORGE CONFIG (DOT NOT REMOVE!)
include forge-conf/default/after/*;
Its root is
/home/forge/default/public;
Forge however reminds you to remove it once you have set up your main site:
Think of sites as representing each “domain” on your server.
The “default” site is included with each freshly provisioned server; however, you should delete it and create a new site with a valid domain name when you are ready to launch your production site. If you need to host additional domains or sub-domains, add them here.
Adding a New Site
We want to add a subdomain and the main site.
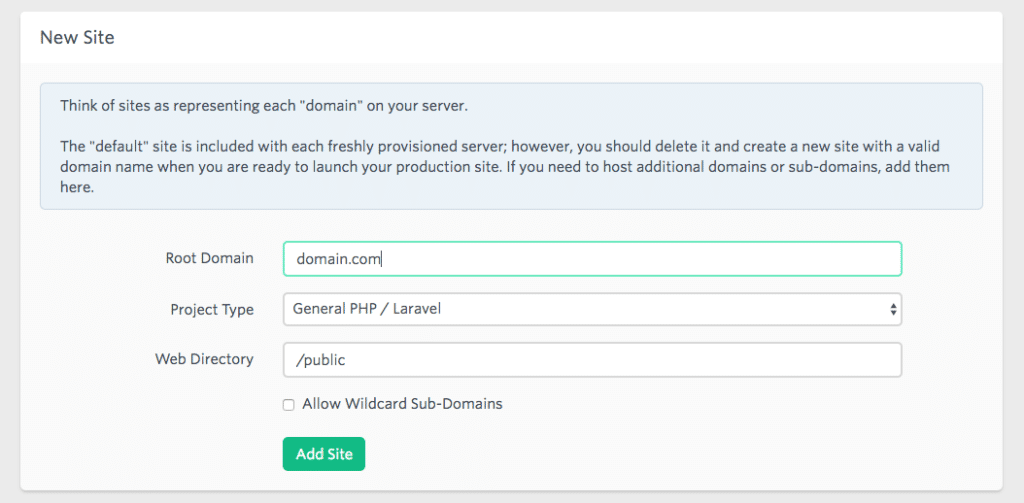
The main domain we allowed with wildcard sub-domains. For the subdomain we did not. So now we had two server blocks or sites setup. Default was still there:
forge@Name-1:/etc/nginx/sites-available$ ll
total 24
drwxr-xr-x 2 root root 4096 Feb 24 13:16 ./
drwxr-xr-x 9 root root 4096 Feb 24 12:42 ../
-rw-r--r-- 1 root root   27 Feb 24 12:41 catch-all
-rw-r--r-- 1 root root 2092 Feb 24 12:42 default
-rw-r--r-- 1 root root 2104 Feb 24 13:16 my.domain.com
-rw-r--r-- 1 root root 2087 Feb 24 13:15 domain.com
Root for the domain.com or main domain is root /home/forge/domain.com/public. For the subdomain it is /home/forge/my.domain.com/public. The catch-all has
server {
return 404;
}
It has no location, it sends out a 404 for anything that is not matched in the other server blocks.
Deployer Deployment Path
For deployment we use deployer.org’s Deployer. We have a script that can deploy on beta and on production. See the link for some details on our deployment script. For more detail on Deployer setup see their site. You do however need to adjust your Nginx’s root as we need it to be /home/forge/domain.com/current/public not /home/forge/domain.com/public. This way you can deal with releases and current release. Also restart your Nginx server.You can do this from the Laravel Forge Control panel This way the release will be served properly:
dep deploy production
✔ Executing task deploy:prepare
✔ Executing task deploy:lock
✔ Executing task deploy:release
➤ Executing task deploy:update_code
Username for 'https://github.com': user
Password for 'https://user@github.com':
Counting objects: 16466, done.
Delta compression using up to 2 threads.
Compressing objects: 100% (7983/7983), done.
Writing objects: 100% (16466/16466), done.
Total 16466 (delta 7946), reused 16466 (delta 7946)
Connection to my.domain.com closed.
✔ Ok
✔ Executing task deploy:shared
✔ Executing task deploy:vendors
✔ Executing task deploy:writable
✔ Executing task artisan:storage:link
✔ Executing task artisan:view:clear
✔ Executing task artisan:cache:clear
✔ Executing task artisan:config:cache
✔ Executing task artisan:optimize
✔ Executing task deploy:symlink
✔ Executing task db:migrate
✔ Executing task cachetool:clear:opcache
✔ Executing task deploy:unlock
✔ Executing task cleanup
✔ Executing task success
Successfully deployed!
Once this is done you will see the Laravel Error Whoops, looks like something went wrong.. This as we do not have a database (server) setup nor have we added our .env file.
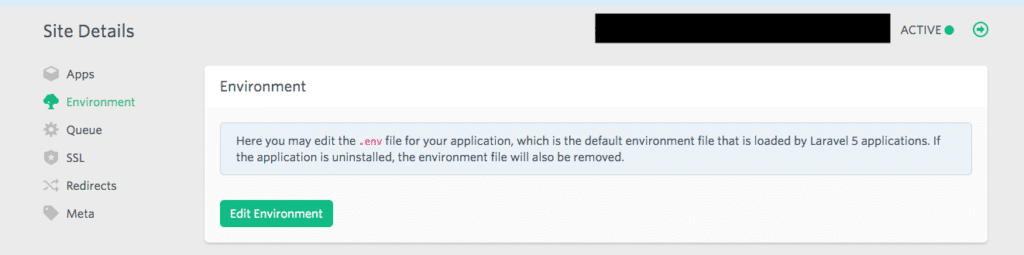
Adding your .env file
Adding your .env file like editing your nginx configuration can be done from the Laravel Forge control panel under site details
Perhaps APP_DEBUG=true would be good to debug possible issues as well. We restarted the server to get it all to show the errors.
Now, Deployer loads .env from ~/domain.com/shared . Laravel Forge grabs it from the web root and stores it there. So until we have a solution you cannot edit .env from Laravel Forge as it will edit the one that is not used / loaded.
Once you have added the .env data to the mentioned location you should start serving the site. You will have achieved Laravel with Laravel Forge on Custom VPS. Only the database… We chose to use a separate database server.
Bonus Database Server
Now we want to setup a database server and see if we can manage this with Laravel Forge as well. Set up a new server with just the server basics as indicated at the beginning here. Now instead of using Laravel Forge just go your own way. Forge is more for LEMP setups. We want a database server. So on the new VPS serverrun
sudo apt-get update
sudo apt-get upgrade
and then install the MariaDB server running:
sudo apt-get install mariadb-server
Then you can access MariaDB using
sudo mysql -uroot
And then you can check out the out of the box databases:
Welcome to the MariaDB monitor.  Commands end with ; or \g.
Your MariaDB connection id is 46
Server version: 10.0.33-MariaDB-0ubuntu0.16.04.1 Ubuntu 16.04

Copyright (c) 2000, 2017, Oracle, MariaDB Corporation Ab and others.

Type 'help;' or '\h' for help. Type '\c' to clear the current input statement.

MariaDB [(none)]> show databases;
+--------------------+
| Database           |
+--------------------+
| information_schema |
| mysql              |
| performance_schema |
+--------------------+
3 rows in set (0.00 sec)
Securing MariaDB
Now securing and setting a new root password is a good idea so:
sudo mysql_secure_installation
You will then get:
NOTE: RUNNING ALL PARTS OF THIS SCRIPT IS RECOMMENDED FOR ALL MariaDB
      SERVERS IN PRODUCTION USE!  PLEASE READ EACH STEP CAREFULLY!

In order to log into MariaDB to secure it, we'll need the current
password for the root user.  If you've just installed MariaDB, and
you haven't set the root password yet, the password will be blank,
so you should just press enter here.

Enter current password for root (enter for none):
OK, successfully used password, moving on...

Setting the root password ensures that nobody can log into the MariaDB
root user without the proper authorisation.

Set root password? [Y/n] Y
New password:
Re-enter new password:
Password updated successfully!
Reloading privilege tables..
 ... Success!


By default, a MariaDB installation has an anonymous user, allowing anyone
to log into MariaDB without having to have a user account created for
them.  This is intended only for testing, and to make the installation
go a bit smoother.  You should remove them before moving into a
production environment.

Remove anonymous users? [Y/n] Y
 ... Success!

Normally, root should only be allowed to connect from 'localhost'.  This
ensures that someone cannot guess at the root password from the network.

Disallow root login remotely? [Y/n] Y
 ... Success!

By default, MariaDB comes with a database named 'test' that anyone can
access.  This is also intended only for testing, and should be removed
before moving into a production environment.

Remove test database and access to it? [Y/n] Y
 - Dropping test database...
 ... Success!
 - Removing privileges on test database...
 ... Success!

Reloading the privilege tables will ensure that all changes made so far
will take effect immediately.

Reload privilege tables now? [Y/n] Y
 ... Success!

Cleaning up...

All done!  If you've completed all of the above steps, your MariaDB
installation should now be secure.

Thanks for using MariaDB!
Now we need to create the database or in our case database AND we we need to allow our web server access .
MariaDB Remote Access
When you read the MariaDB documentation on the bind address you will find out that you need to change this for Ubuntu systems as they use 127.0.0.1 instead of 0.0.0.0. The file you need to change is /etc/mysql/mariadb.conf.d/50-server.cnf. What we can do is add a specific ip address or hostname. Now we are on an Ubuntu 16.0.4 server here so we open
/etc/mysql/mariadb.conf.d/50-server.cnf
There you will find
# Instead of skip-networking the default is now to listen only on
# localhost which is more compatible and is not less secure.
bind-address = 127.0.0.1
And they indicate example my.ncf files as well at /usr/share/mysql/. Only we found none..
MariaDB Config Files
Now, we prefer to use our own configuration file and leave the default be. So we look into the documentation of MariaDB and see my.cnf could be in many locations. Then we check our box and find a symlink to the my.cnf:
me@domain-database:/etc/mysql$ ll
total 32
drwxr-xr-x  4 root root 4096 Feb 24 17:57 ./
drwxr-xr-x 93 root root 4096 Feb 24 17:57 ../
drwxr-xr-x  2 root root 4096 Feb 24 18:14 conf.d/
-rw-------  1 root root  277 Feb 24 17:57 debian.cnf
-rwxr-xr-x  1 root root 1426 Jan 16 17:46 debian-start*
-rw-r--r--  1 root root  869 Jan 16 17:46 mariadb.cnf
drwxr-xr-x  2 root root 4096 Feb 25 07:42 mariadb.conf.d/
lrwxrwxrwx  1 root root   24 Feb 24 17:57 my.cnf -> /etc/alternatives/my.cnf
-rw-r--r--  1 root root  839 Jan 21  2017 my.cnf.fallback
and there is a mariadb.cnf as well. The latter just seems to read config files from several locations:
# The MariaDB configuration file
#
# The MariaDB/MySQL tools read configuration files in the following order:
# 1. "/etc/mysql/mariadb.cnf" (this file) to set global defaults,
# 2. "/etc/mysql/conf.d/*.cnf" to set global options.
# 3. "/etc/mysql/mariadb.conf.d/*.cnf" to set MariaDB-only options.
# 4. "~/.my.cnf" to set user-specific options.
My.cnf Choice
The my.cnf file /etc/alternatives/my.cnf is a replica of the mariadb.cnf file. So the best way seems to add one to /etc/mysql/conf.d/. In that directory we have:
/etc/mysql/conf.d$ ll
total 16
drwxr-xr-x 2 root root 4096 Feb 24 18:14 ./
drwxr-xr-x 4 root root 4096 Feb 24 17:57 ../
-rw-r--r-- 1 root root    8 Jan 21  2017 mysql.cnf
-rw-r--r-- 1 root root   55 Jan 21  2017 mysqldump.cnf
So we can create a my.cnf here.. Well I read some more and did a:
mysql --help
to figure out how the my.cnfs are being loaded:
mysql --help
mysql  Ver 15.1 Distrib 10.0.33-MariaDB, for debian-linux-gnu (x86_64) using readline 5.2
Copyright (c) 2000, 2017, Oracle, MariaDB Corporation Ab and others.

Usage: mysql [OPTIONS] [database]

Default options are read from the following files in the given order:
/etc/my.cnf /etc/mysql/my.cnf ~/.my.cnf
I also did a search for existing my.cnfs:
sudo find / -name my.cnf
/var/lib/dpkg/alternatives/my.cnf
/etc/mysql/my.cnf
/etc/alternatives/my.cnf
From these locations mariadb.cnf does not read. But according to the mysql –help output /etc/mysql/my.cnf should be read. And for that we have the symlink to /etc/alternatives/my.cnf. This has been created by MariaDB. This file has the same content as mariadb.cnf
# The MariaDB configuration file
#
# The MariaDB/MySQL tools read configuration files in the following order:
# 1. "/etc/mysql/mariadb.cnf" (this file) to set global defaults,
# 2. "/etc/mysql/conf.d/*.cnf" to set global options.
# 3. "/etc/mysql/mariadb.conf.d/*.cnf" to set MariaDB-only options.
# 4. "~/.my.cnf" to set user-specific options.
#
# If the same option is defined multiple times, the last one will apply.
#
# One can use all long options that the program supports.
# Run program with --help to get a list of available options and with
# --print-defaults to see which it would actually understand and use.

#
# This group is read both both by the client and the server
# use it for options that affect everything
#
[client-server]

# Import all .cnf files from configuration directory
!includedir /etc/mysql/conf.d/
!includedir /etc/mysql/mariadb.conf.d/
So we have come full circle and I can add a my.cnf to /etc/mysql/conf.d/. So we did. Here is the content of my.cnf
[mysqld]
user		= mysql
pid-file	= /var/run/mysqld/mysqld.pid
socket	= /var/run/mysqld/mysqld.sock
port		= 3306
basedir	= /usr
datadir	= /var/lib/mysql
tmpdir	= /tmp
lc-messages-dir	= /usr/share/mysql
bind-address    = 0.0.0.0
After adding it we did a /etc/init.d/mysql restart.
Grant User Access from Remote Host
When we check our database we only have one user and root has localhost access only, not wildcard or %:
MariaDB [(none)]> SELECT User, Host FROM mysql.user;
+------+-----------+
| User | Host      |
+------+-----------+
| root | localhost |
+------+-----------+
1 row in set (0.00 sec)
So we create a new user forge as Laravel Forge does it.
CREATE USER 'forge'@'localhost' IDENTIFIED BY 'tough password'
GRANT ALL PRIVILEGES ON * . * TO 'forge'@'localhost';
I also add ip address of web server to user forge
GRANT ALL PRIVILEGES ON * . * TO 'forge'@'xxx.xxx.xxx.xxx';
Afterwards do not forget to do a
FLUSH PRIVILEGES;
Database Creation
Do the following from the mysql command line
CREATE DATABASE forge
GRANT ALL PRIVILEGES ON forge TO 'forge'@'localhost';
GRANT ALL PRIVILEGES ON forge TO 'forge'@'xxx.xxx.xxx.xxx';
FLUSH PRIVILEGES;
IPTables / Firewall Update
To allow the web server access to the database server and other ip addresses not I did the following:
/sbin/iptables -A INPUT -p tcp --dport 3306 ! -s xxx.xxx.xxx.xxx -j DROP
and to check it I did a :
echo -e "target prot opt source destination\n$(iptables -L INPUT -n | grep 3306)"
You will then see something like:
target prot opt source destination
DROP       tcp  -- !xxx.xxx.xxx.xxx      0.0.0.0/0            tcp dpt:3306
NB For saving and loading of ip tables with ease use iptables-persistent
NBB See Great Cybercity article
Outstanding Issues
Still cannot connect via Sequel Pro and ssh. SSH works, but MySQL connection refused. So did a
GRANT ALL ON yourdatabase.* TO youruser@'*' IDENTIFIED BY 'yourpassword';
and flushed privileges once again. Also did a /etc/init.d/mysql restart. No joy. Time for a break.
Tried a:
mysql -u forge -h xxx.xxx.xxx.xx -P 3306 -p forge
from the web server, but got a
ERROR 2003 (HY000): Can't connect to MySQL server on 'xxx.xxx.xxx.xx' (111 "Connection refused")
as well. So tried a (adjust ip address and user!):
GRANT ALL PRIVILEGES ON *.* TO 'root'@'192.168.100.%' IDENTIFIED BY 'my-new-password' WITH GRANT OPTION;
and flushed privileges. Did not help. So then I wondered if my my.cnf was being loaded..
Proper CNF Found
In the end thanks to SO and Spicyramen I did a stacktrace
strace mysql ";" 2>&1  | grep cnf
stat("/etc/my.cnf", 0x7ffcbe6d9ec0)     = -1 ENOENT (No such file or directory)
stat("/etc/mysql/my.cnf", {st_mode=S_IFREG|0644, st_size=869, ...}) = 0
open("/etc/mysql/my.cnf", O_RDONLY)     = 3
stat("/etc/mysql/conf.d/my.cnf", {st_mode=S_IFREG|0644, st_size=230, ...}) = 0
open("/etc/mysql/conf.d/my.cnf", O_RDONLY) = 4
stat("/etc/mysql/conf.d/mysql.cnf", {st_mode=S_IFREG|0644, st_size=8, ...}) = 0
open("/etc/mysql/conf.d/mysql.cnf", O_RDONLY) = 4
stat("/etc/mysql/conf.d/mysqldump.cnf", {st_mode=S_IFREG|0644, st_size=55, ...}) = 0
open("/etc/mysql/conf.d/mysqldump.cnf", O_RDONLY) = 4
stat("/etc/mysql/mariadb.conf.d/50-client.cnf", {st_mode=S_IFREG|0644, st_size=495, ...}) = 0
open("/etc/mysql/mariadb.conf.d/50-client.cnf", O_RDONLY) = 4
stat("/etc/mysql/mariadb.conf.d/50-mysql-clients.cnf", {st_mode=S_IFREG|0644, st_size=336, ...}) = 0
open("/etc/mysql/mariadb.conf.d/50-mysql-clients.cnf", O_RDONLY) = 4
stat("/etc/mysql/mariadb.conf.d/50-mysqld_safe.cnf", {st_mode=S_IFREG|0644, st_size=321, ...}) = 0
open("/etc/mysql/mariadb.conf.d/50-mysqld_safe.cnf", O_RDONLY) = 4
stat("/etc/mysql/mariadb.conf.d/50-server.cnf", {st_mode=S_IFREG|0644, st_size=3492, ...}) = 0
open("/etc/mysql/mariadb.conf.d/50-server.cnf", O_RDONLY) = 4
stat("/home/jasper/.my.cnf", 0x7ffcbe6d9ec0) = -1 ENOENT (No such file or directory)
and found out the /etc/mysql/mariadb.conf.d/50-server.cnf seemed to overrule my own my.cnf so changed the bind address to 0.0.0.0 there and restarted the mysql server:
user@site-database:~$ sudo su
[sudo] password for user:
root@site-database:/home/user# nano /etc/mysql/mariadb.conf.d/50-server.cnf
root@site-database:/home/user# /etc/init.d/mysql restart
[ ok ] Restarting mysql (via systemctl): mysql.service.
Then when I did another:
mysql -u forge -h xxx.xxx.xxx.xx -P 3306 -p forge
I got in.
Sequel Pro Access
With Sequel Pro I could not get in so did a:
/sbin/iptables -A OUTPUT -o lo -p tcp --sport 3306 -j ACCEPT
and then I did that rule added twice besides my unique ip address access only:
echo -e "target prot opt source destination\n$(iptables -L INPUT -n | grep 3306)"
target prot opt source destination
DROP        tcp  -- !xxx.xxx.xxx        0.0.0.0/0            tcp dpt:3306
ACCEPT     tcp  --  0.0.0.0/0            0.0.0.0/0            tcp dpt:3306
ACCEPT     tcp  --  0.0.0.0/0            0.0.0.0/0            tcp dpt:3306
But it did not work and was not added to /etc/iptables/rules.v4 like the ip address rule.
So I had to remove persistent-tables:
sudo apt-get remove iptables-persistent
and the specific ip address rule for now doing a:
iptables -P INPUT ACCEPT
iptables -P OUTPUT ACCEPT
iptables -P FORWARD ACCEPT
Followed by flushing the rules:
iptables -F INPUT
iptables -F OUTPUT
iptables -F FORWARD
Will restore the rules later. Just need to add some content first now. I do now have access from the web server and from Sequel Pro!